Stitching a Signature
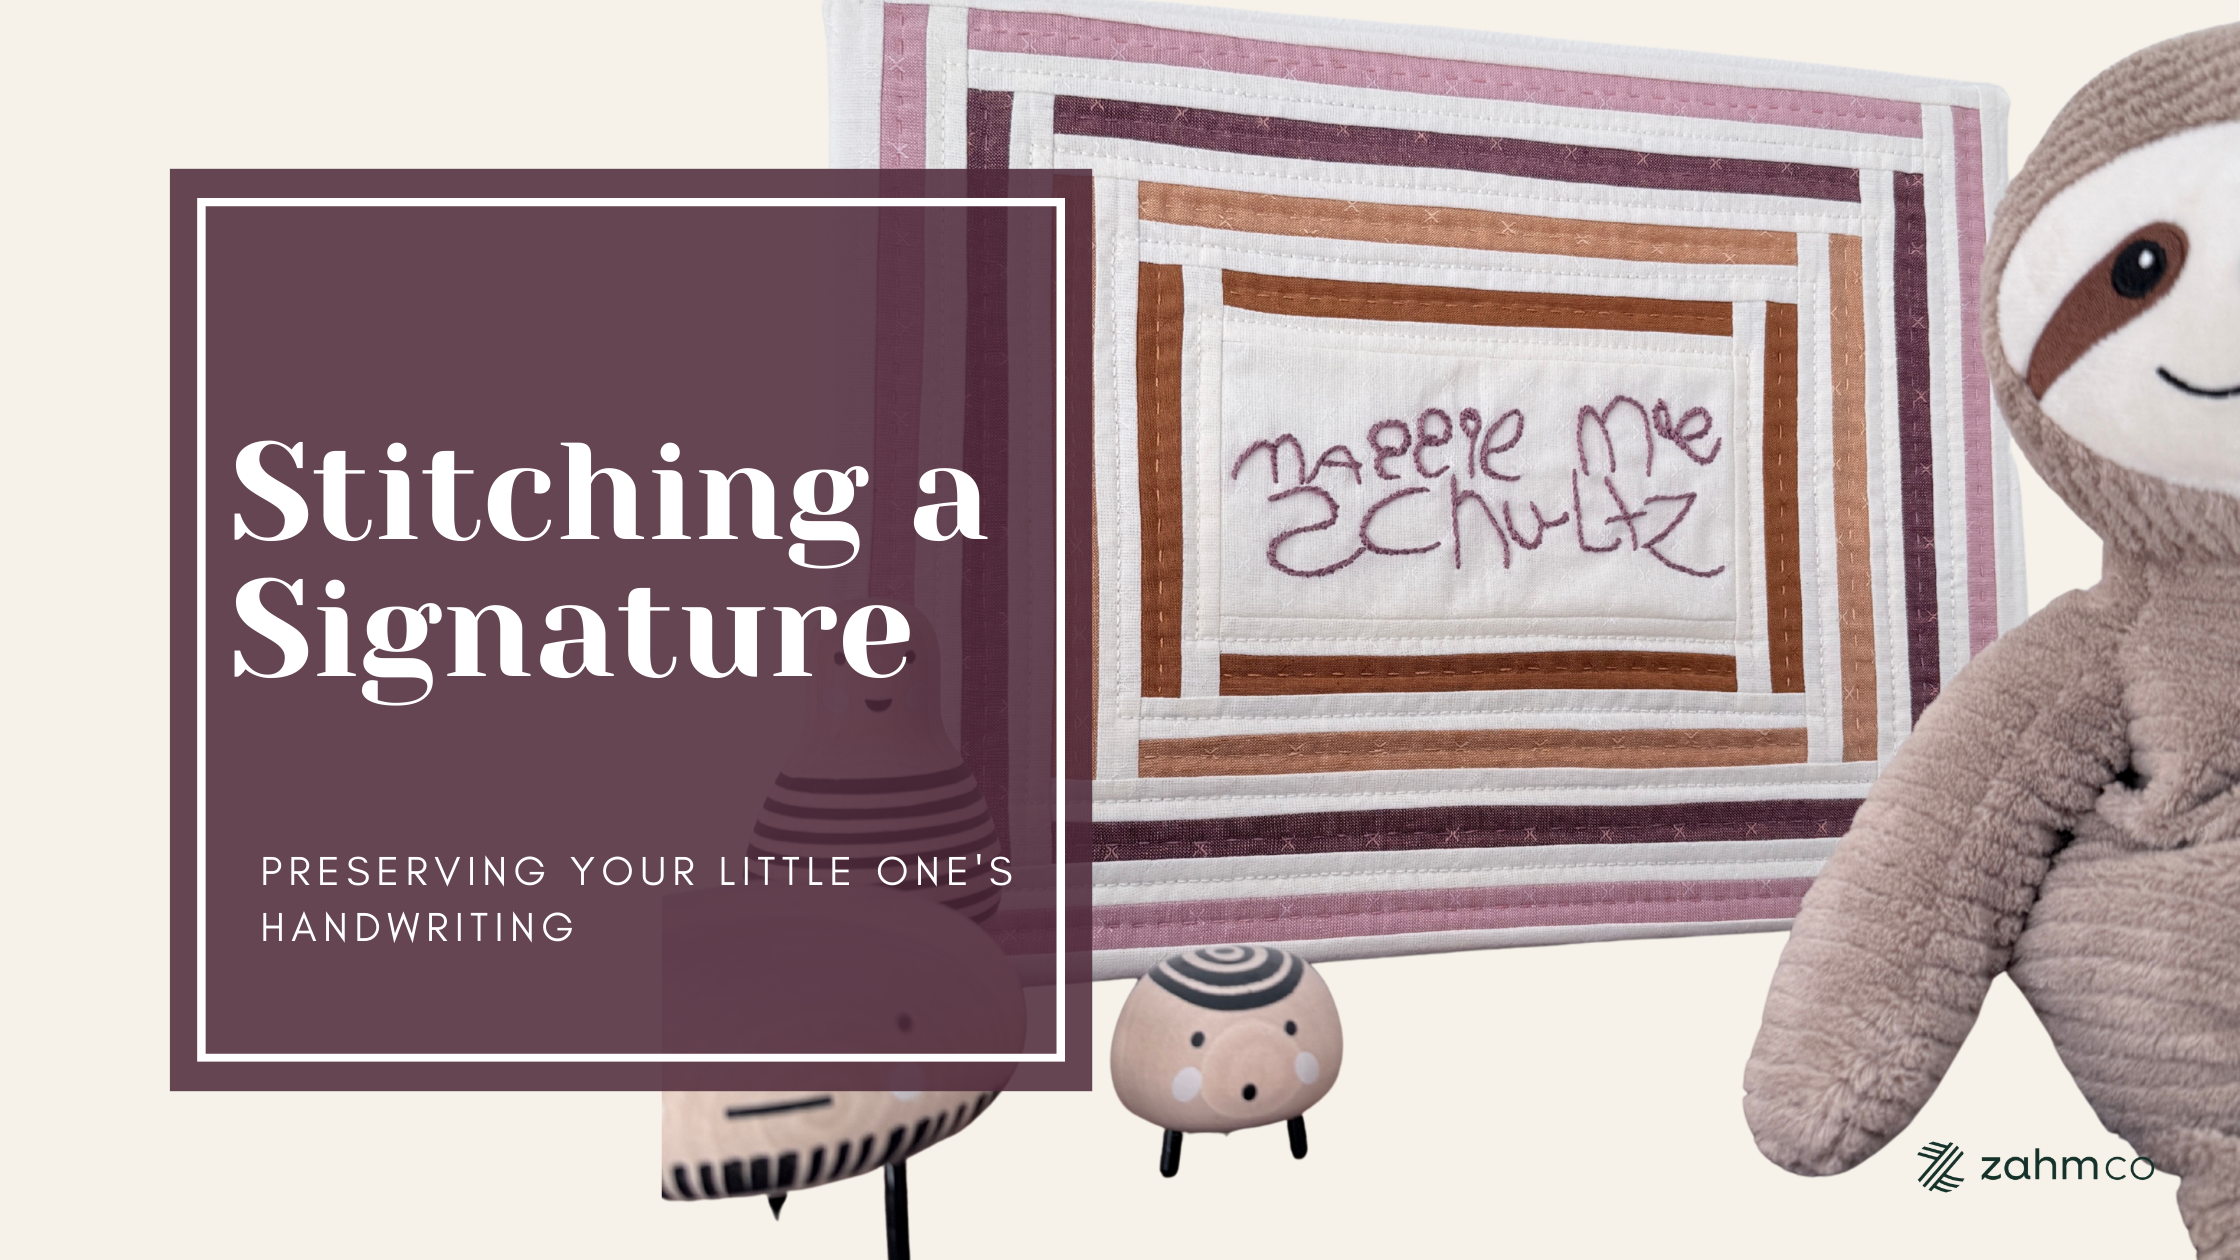
Preserving your little one's handwriting.For Aurifil's February Artisan challenge, we're diving into the art of thread color matching. The challenge? Turn to your Aurifil swatch card and use it to find the perfect thread pairings for your next project. Whether you're piecing, quilting, hand stitching, or adding detail to a quilt, the swatch book is your secret weapon.
I also want to give a quick shoutout to January's challenge, the 3:2:1: take at least 3 thread colors, in at least 2 different thread weights, and incorporate them into 1 project. I missed that month but honestly, that's how I approach most of my projects by default. So while I'm focused on color matching here, this project checks that box too.
Let me walk you through what I made.
The Idea
My 4-year-old niece Maggie is at that stage where she's learning to write her name, and her handwriting right now is the sweetest thing. I wanted to capture the way she currently signs her name and turn it into something my sister could keep forever. Of course, I had to add the quilting touches.
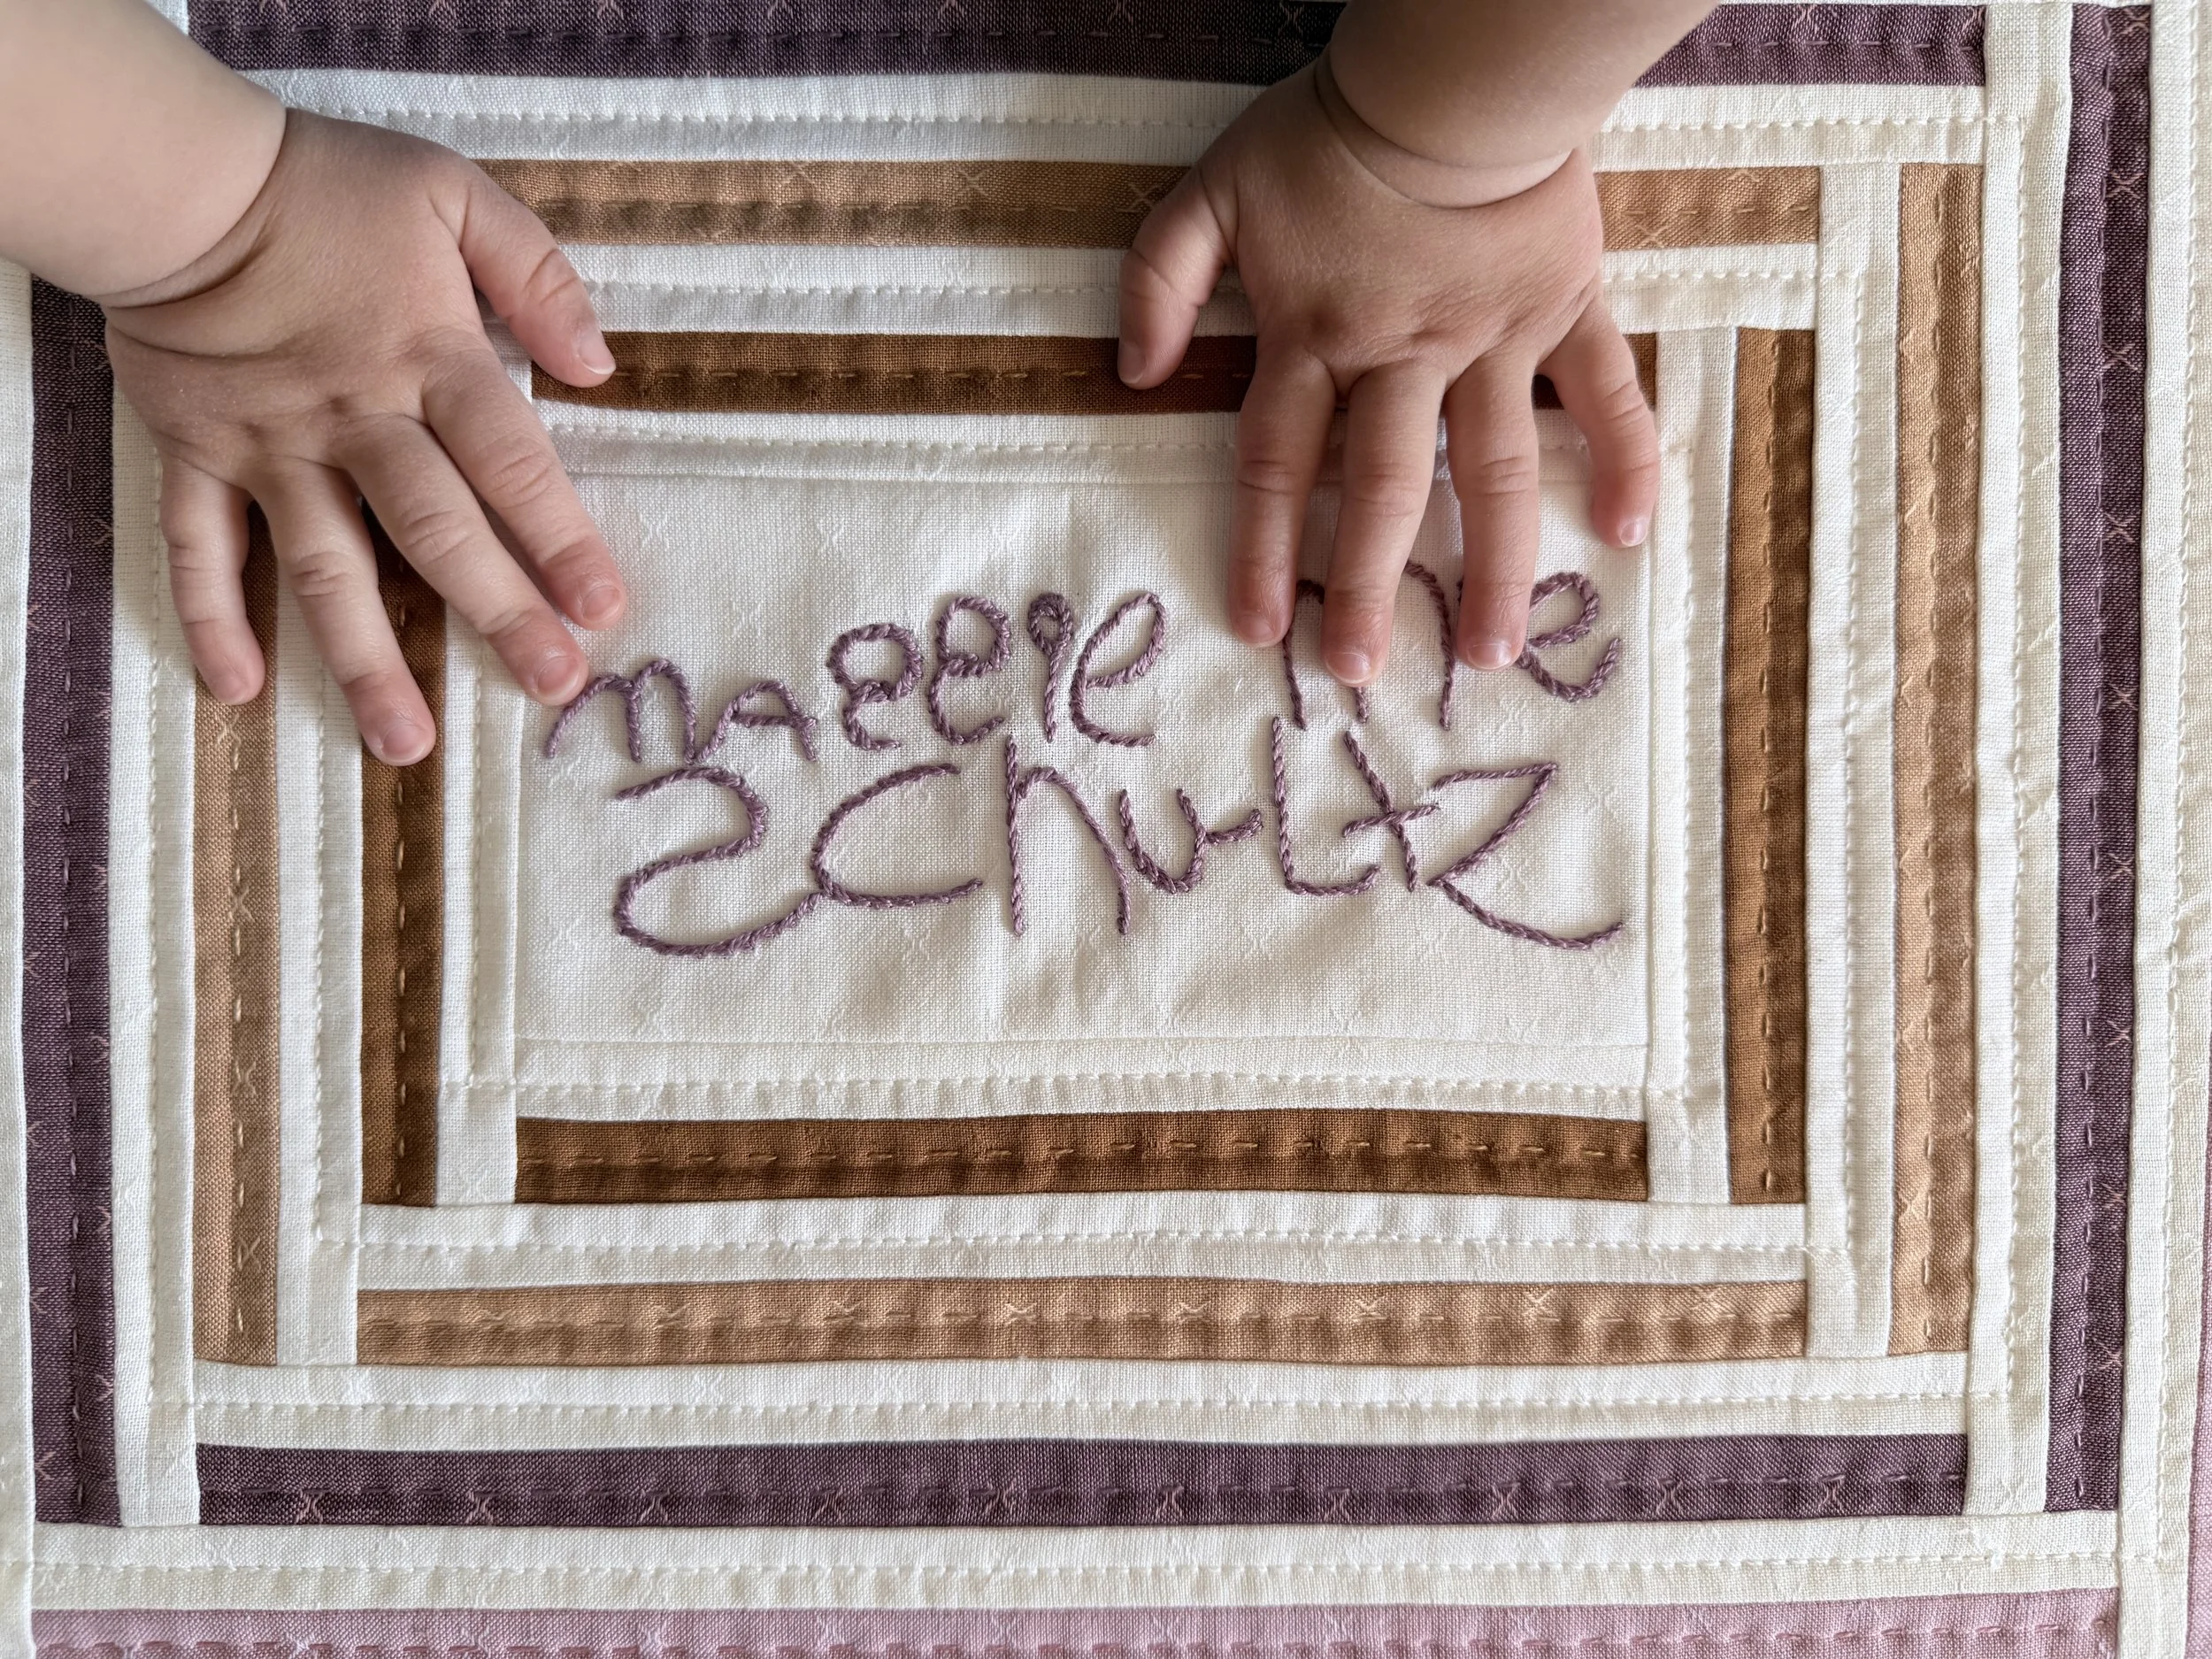
Dominic’s little hands feeling all the texture.
Aurifil Cotton 8wt 2930 Golden Toast, 12wt 2318 Cashmere, 8wt 2566 Wisteria, 12wt 2437 Light Peony, 12wt 6722 Sea Biscuit, and 40wt 2600 Dove (piecing).
The Process
Getting the Signature Ready
I asked my sister to send me a photo of Maggie's signature. From there, I scanned it and vectorized it to clean things up. There were a few fun little quirks in the original that weren't part of her normal handwriting, so I cleaned those up and printed the version I was going to work from.
Note: This step was overkill on my part. You can absolutely skip the scanning and vectorizing and go straight from the photo to tracing.
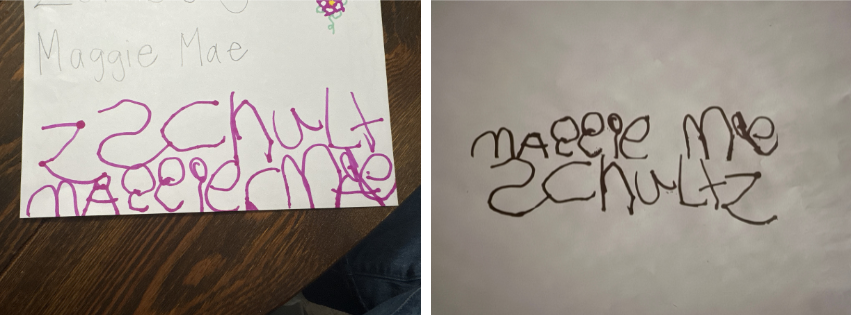
Original on left, after talking to her mom we cleaned it up some using Adobe Illustrator Tracing feature.
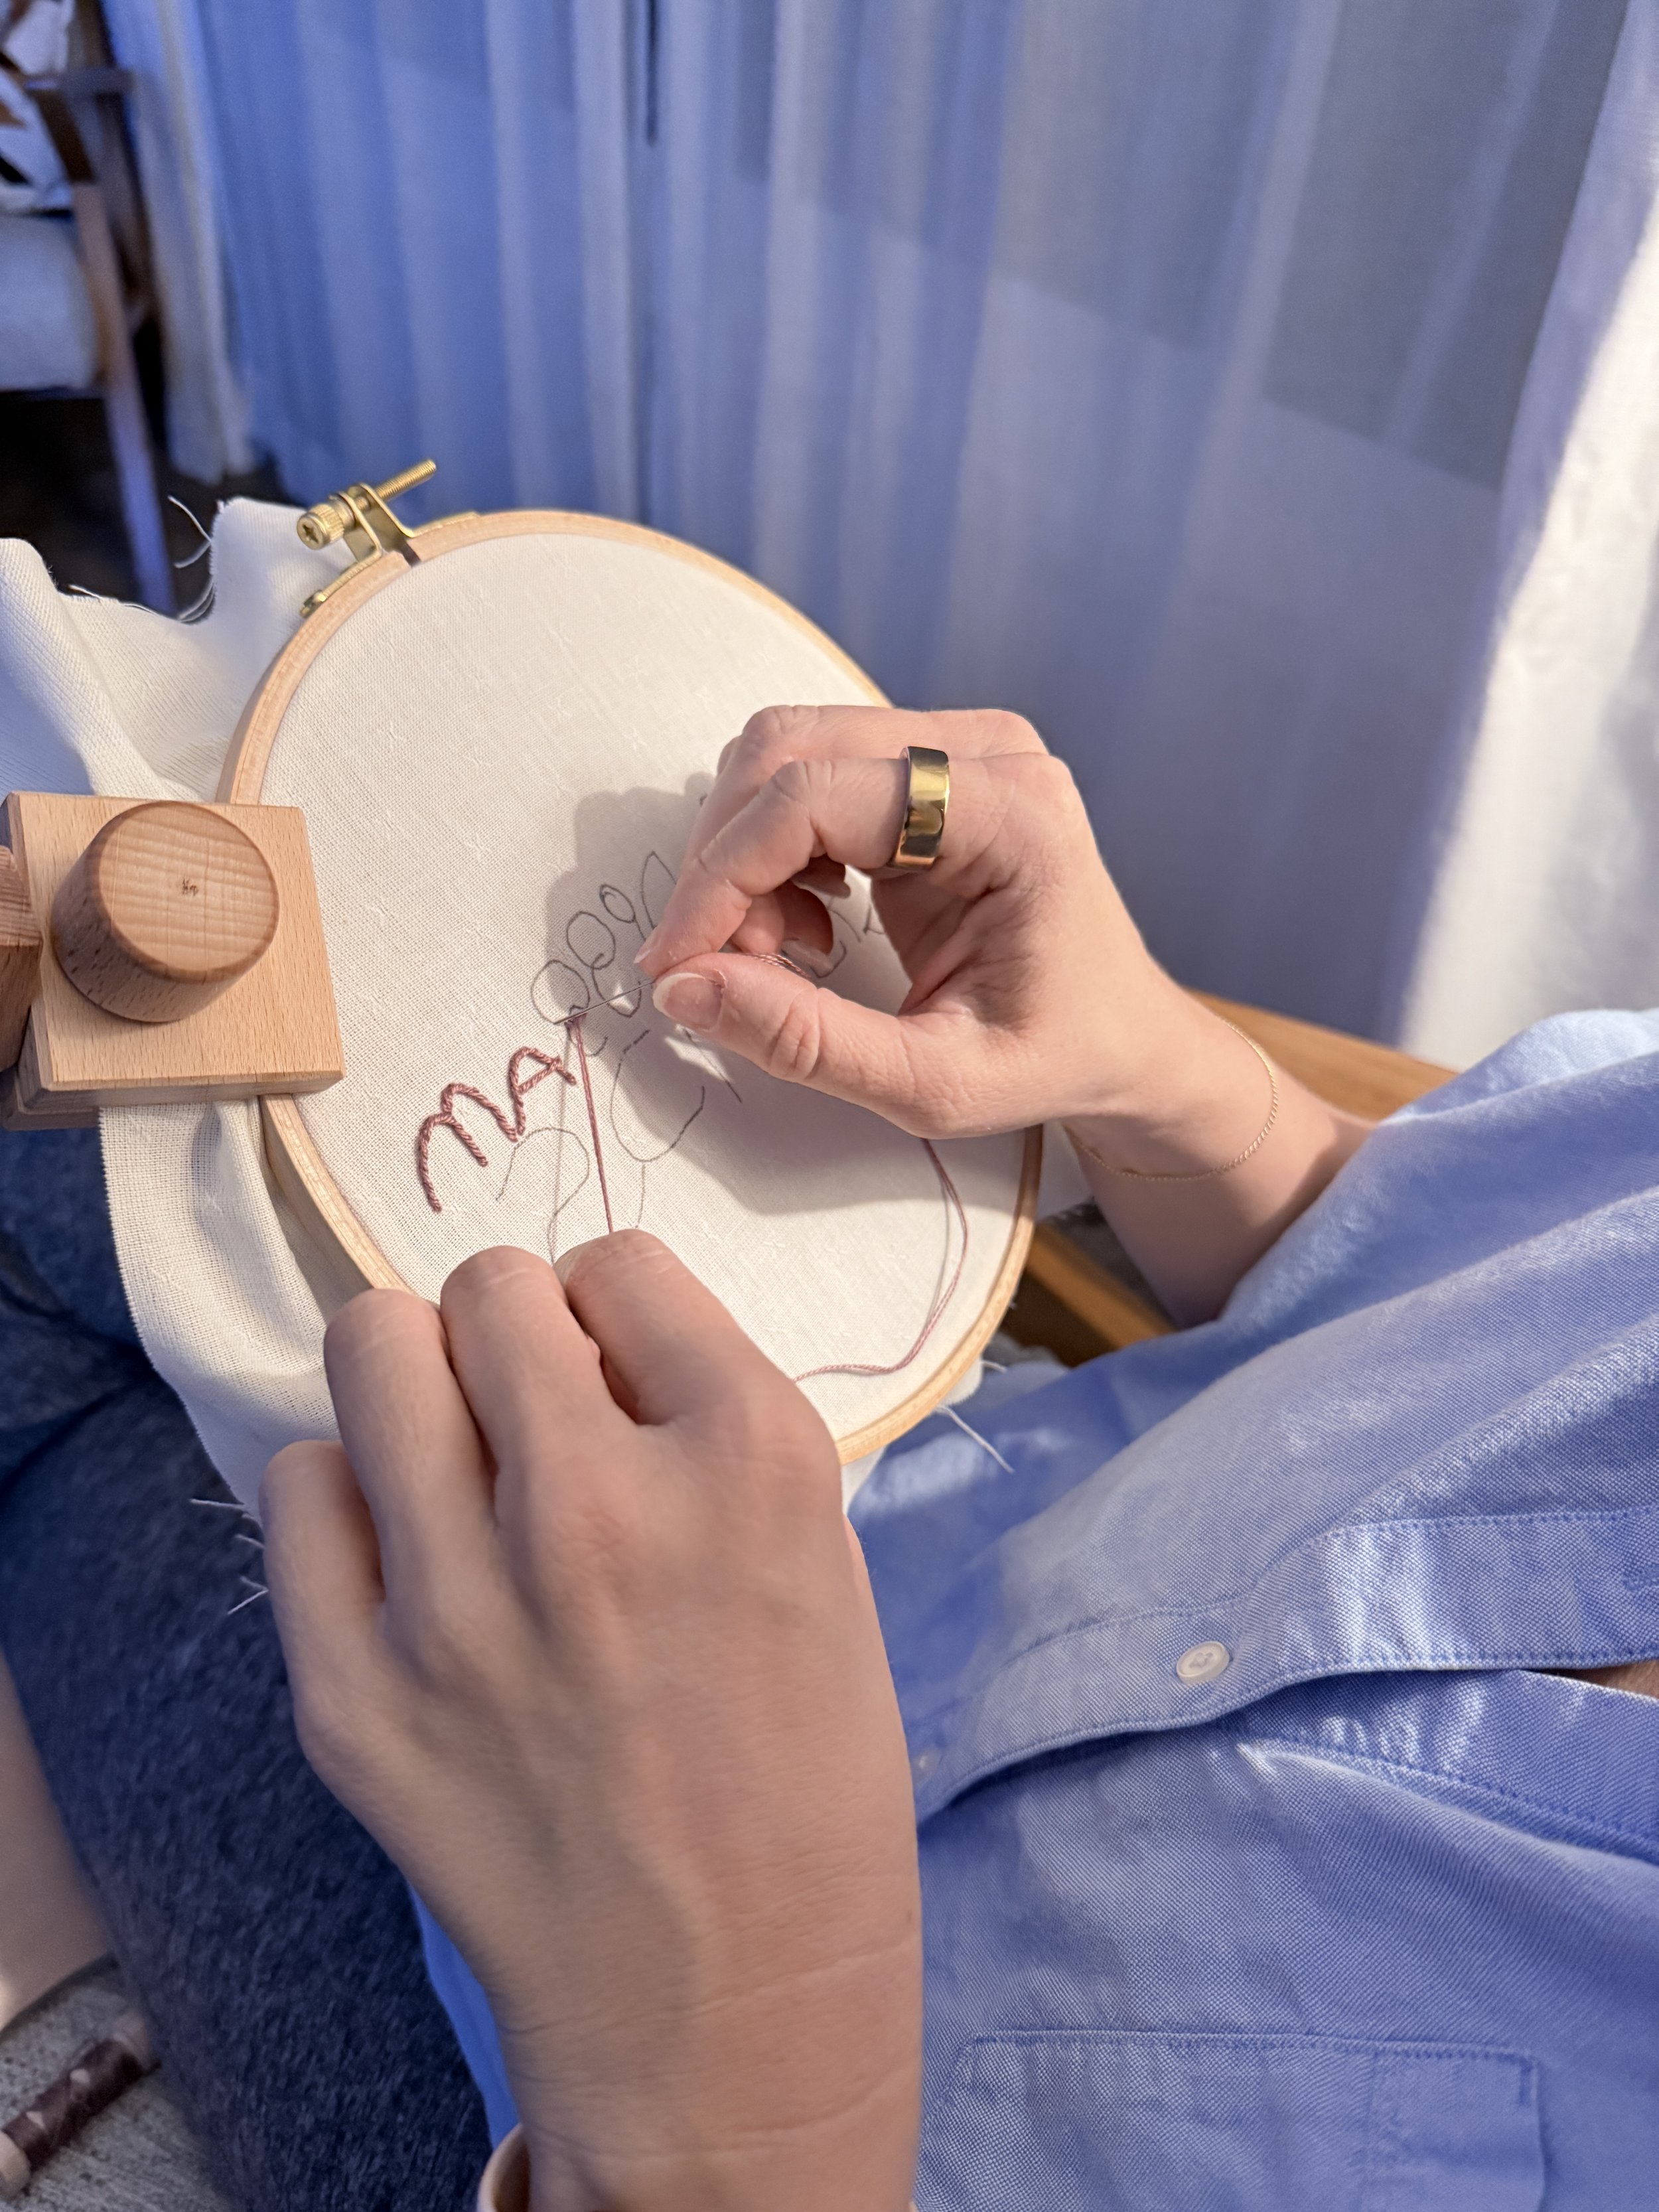
Tracing + Embroidery
I traced the signature onto fabric using my iPad as a lightbox and a Frixion heat erasable pen. Then, using a hoop, I embroidered her name with Aurifil Cotton 8wt 2566 Wisteria thread using the stem stitch.
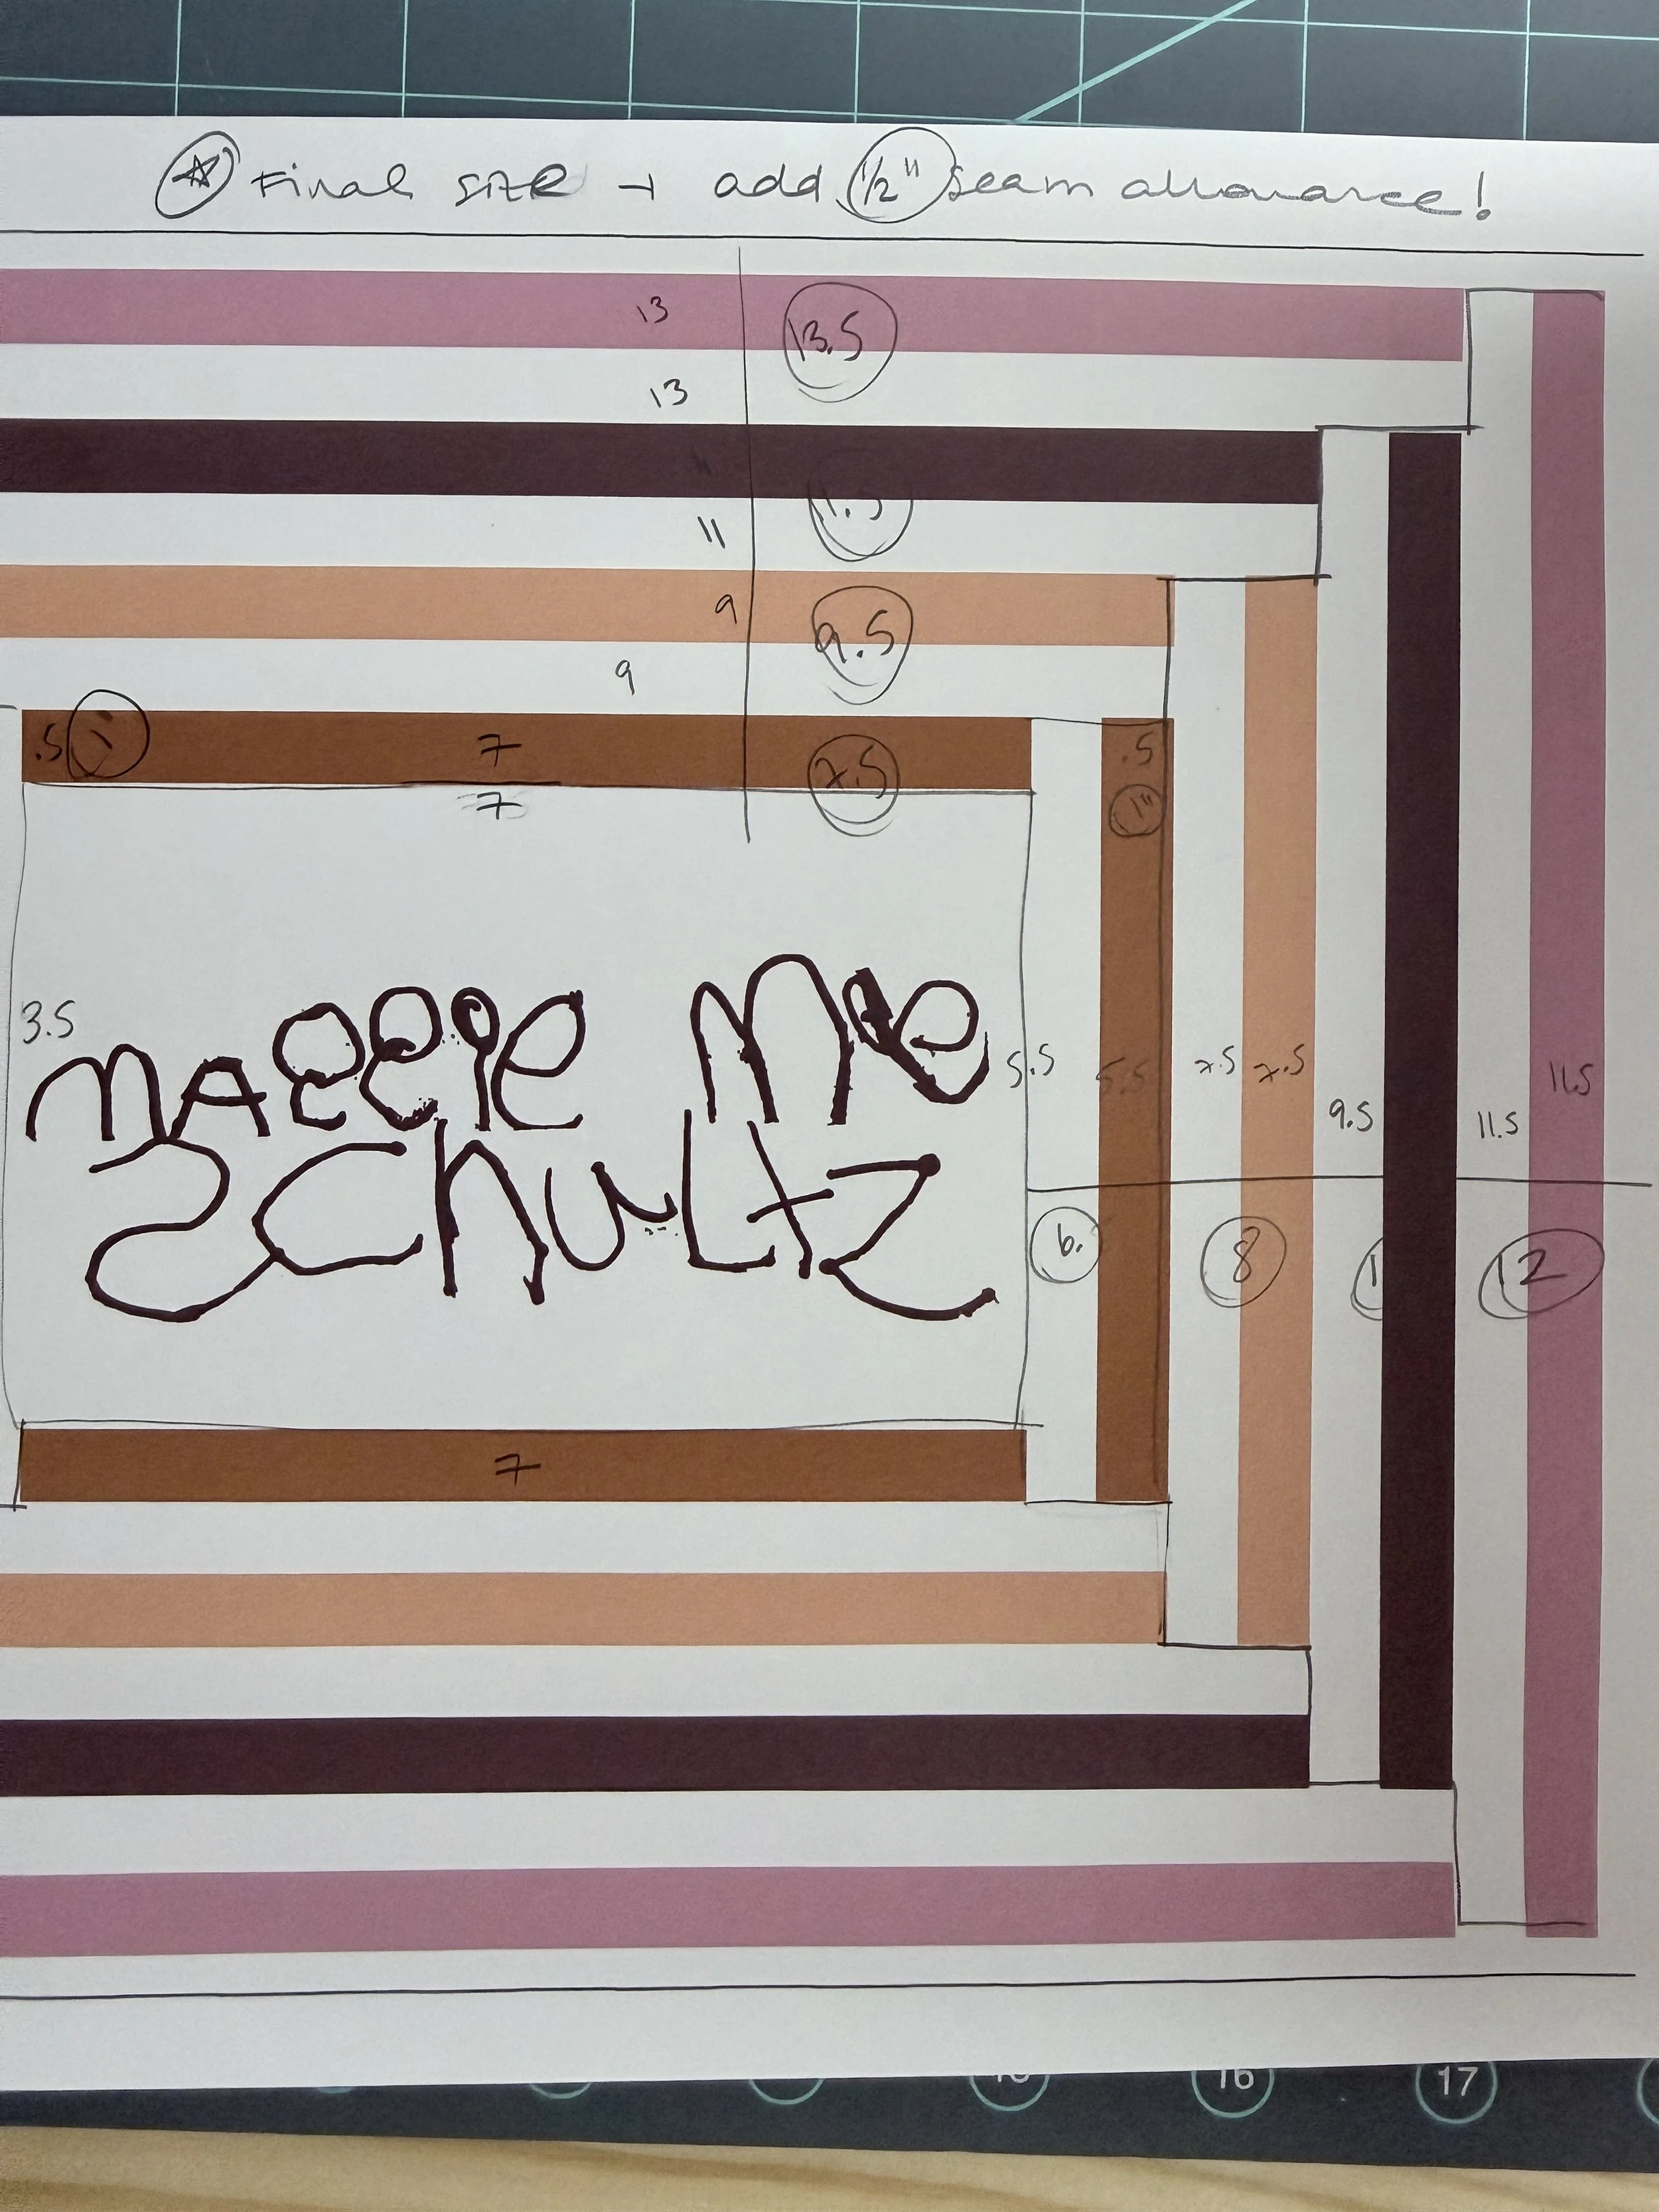
Designing the Quilt Block
I designed the block in Adobe Illustrator, building concentric rectangles around Maggie's embroidered name as the center focal point. The idea was to frame her signature with layers of color that draw your eye inward.
Here's a little technique I used while designing: instead of making the quilt block and then finding a canvas to fit, I searched canvas sizes first and matched the quilt block design to the canvas. Working backwards like that made the whole thing come together smoothly.
Thread Matching to Fabric with the Aurifil Swatch Book
This is where the Aurifil swatch book really came through. The card includes actual thread samples and is designed to come apart, so you can hold individual swatches directly against your fabric. For this project, I needed to match thread to each of my Fableism wovens, and here's where I landed.
I used my Sweet Mae core colors from Fableism Woven Sprouts:
Cider, Sun Glow, Mulberry, Pansy Pink, and Sugar.
And matched each one with Aurifil thread using the swatch card:
Cotton 8wt 2930 Golden Toast matches to Cider
Cotton 12wt 2318 Cashmere matches to Sun Glow
Cotton 8wt 2566 Wisteria matches to Mulberry
Cotton 12wt 2437 Light Peony matches to Pansy Pink
Cotton 12wt 6722 Sea Biscuit matches to Sugar
Cotton 40wt 2600 Dove for piecing
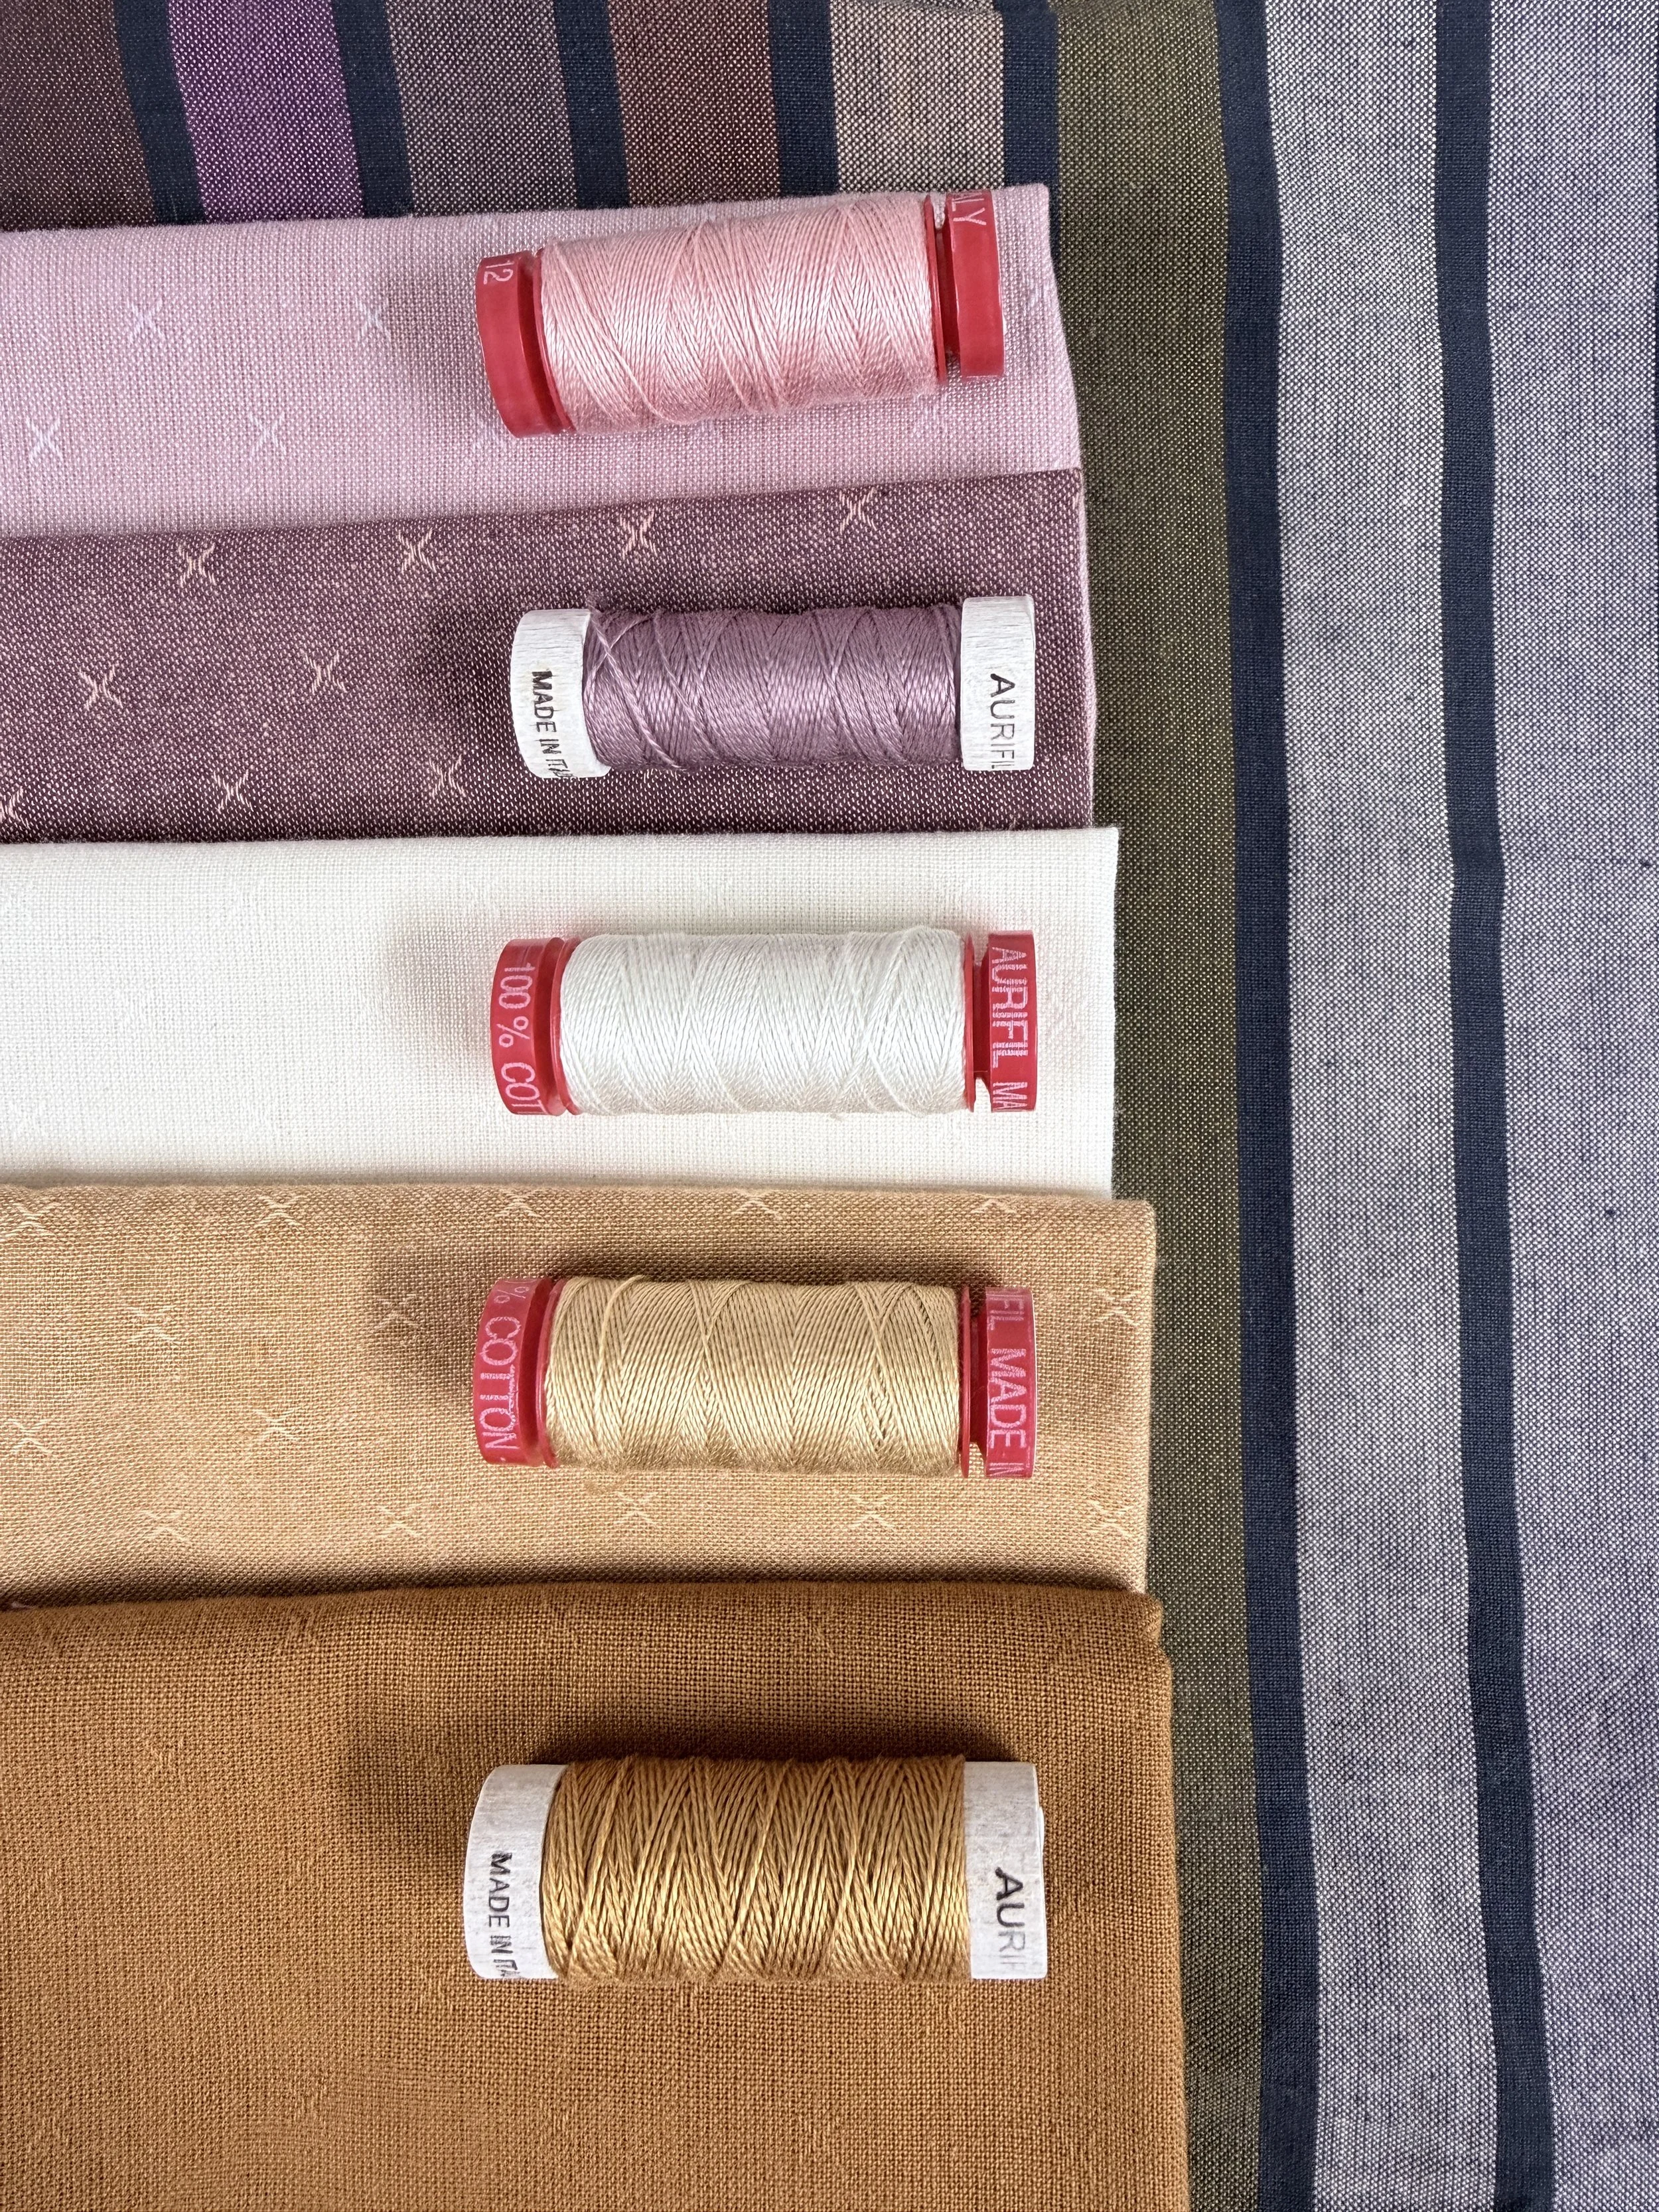
In order starting at the top: Aurifil Cotton 12wt 2437 Light Peony, 8wt 2566 Wisteria, 12wt 6722 Sea Biscuit, 12wt 2318 Cashmere, 8wt 2930 Golden Toast, and 40wt 2600 Dove (piecing).
Being Transparent About the Tricky Ones
Mulberry and Pansy Pink were the challenge colors for me. The swatch card was a lifesaver, but even then, working with the cotton wovens, I felt like I had more options than I expected. I could have pulled the darker woven thread or the lighter and been just fine either way. But with my brain running at full capacity lately, I was a little frozen in the decision making. That said, I love how it all turned out.
Quilting
For the quilting, I used the Cotton 12wt 6722 Sea Biscuit in the machine for the background color stitching, and then added hand stitches to the concentric rectangles design. I marked all my quilting lines with a Hera marker before stitching.
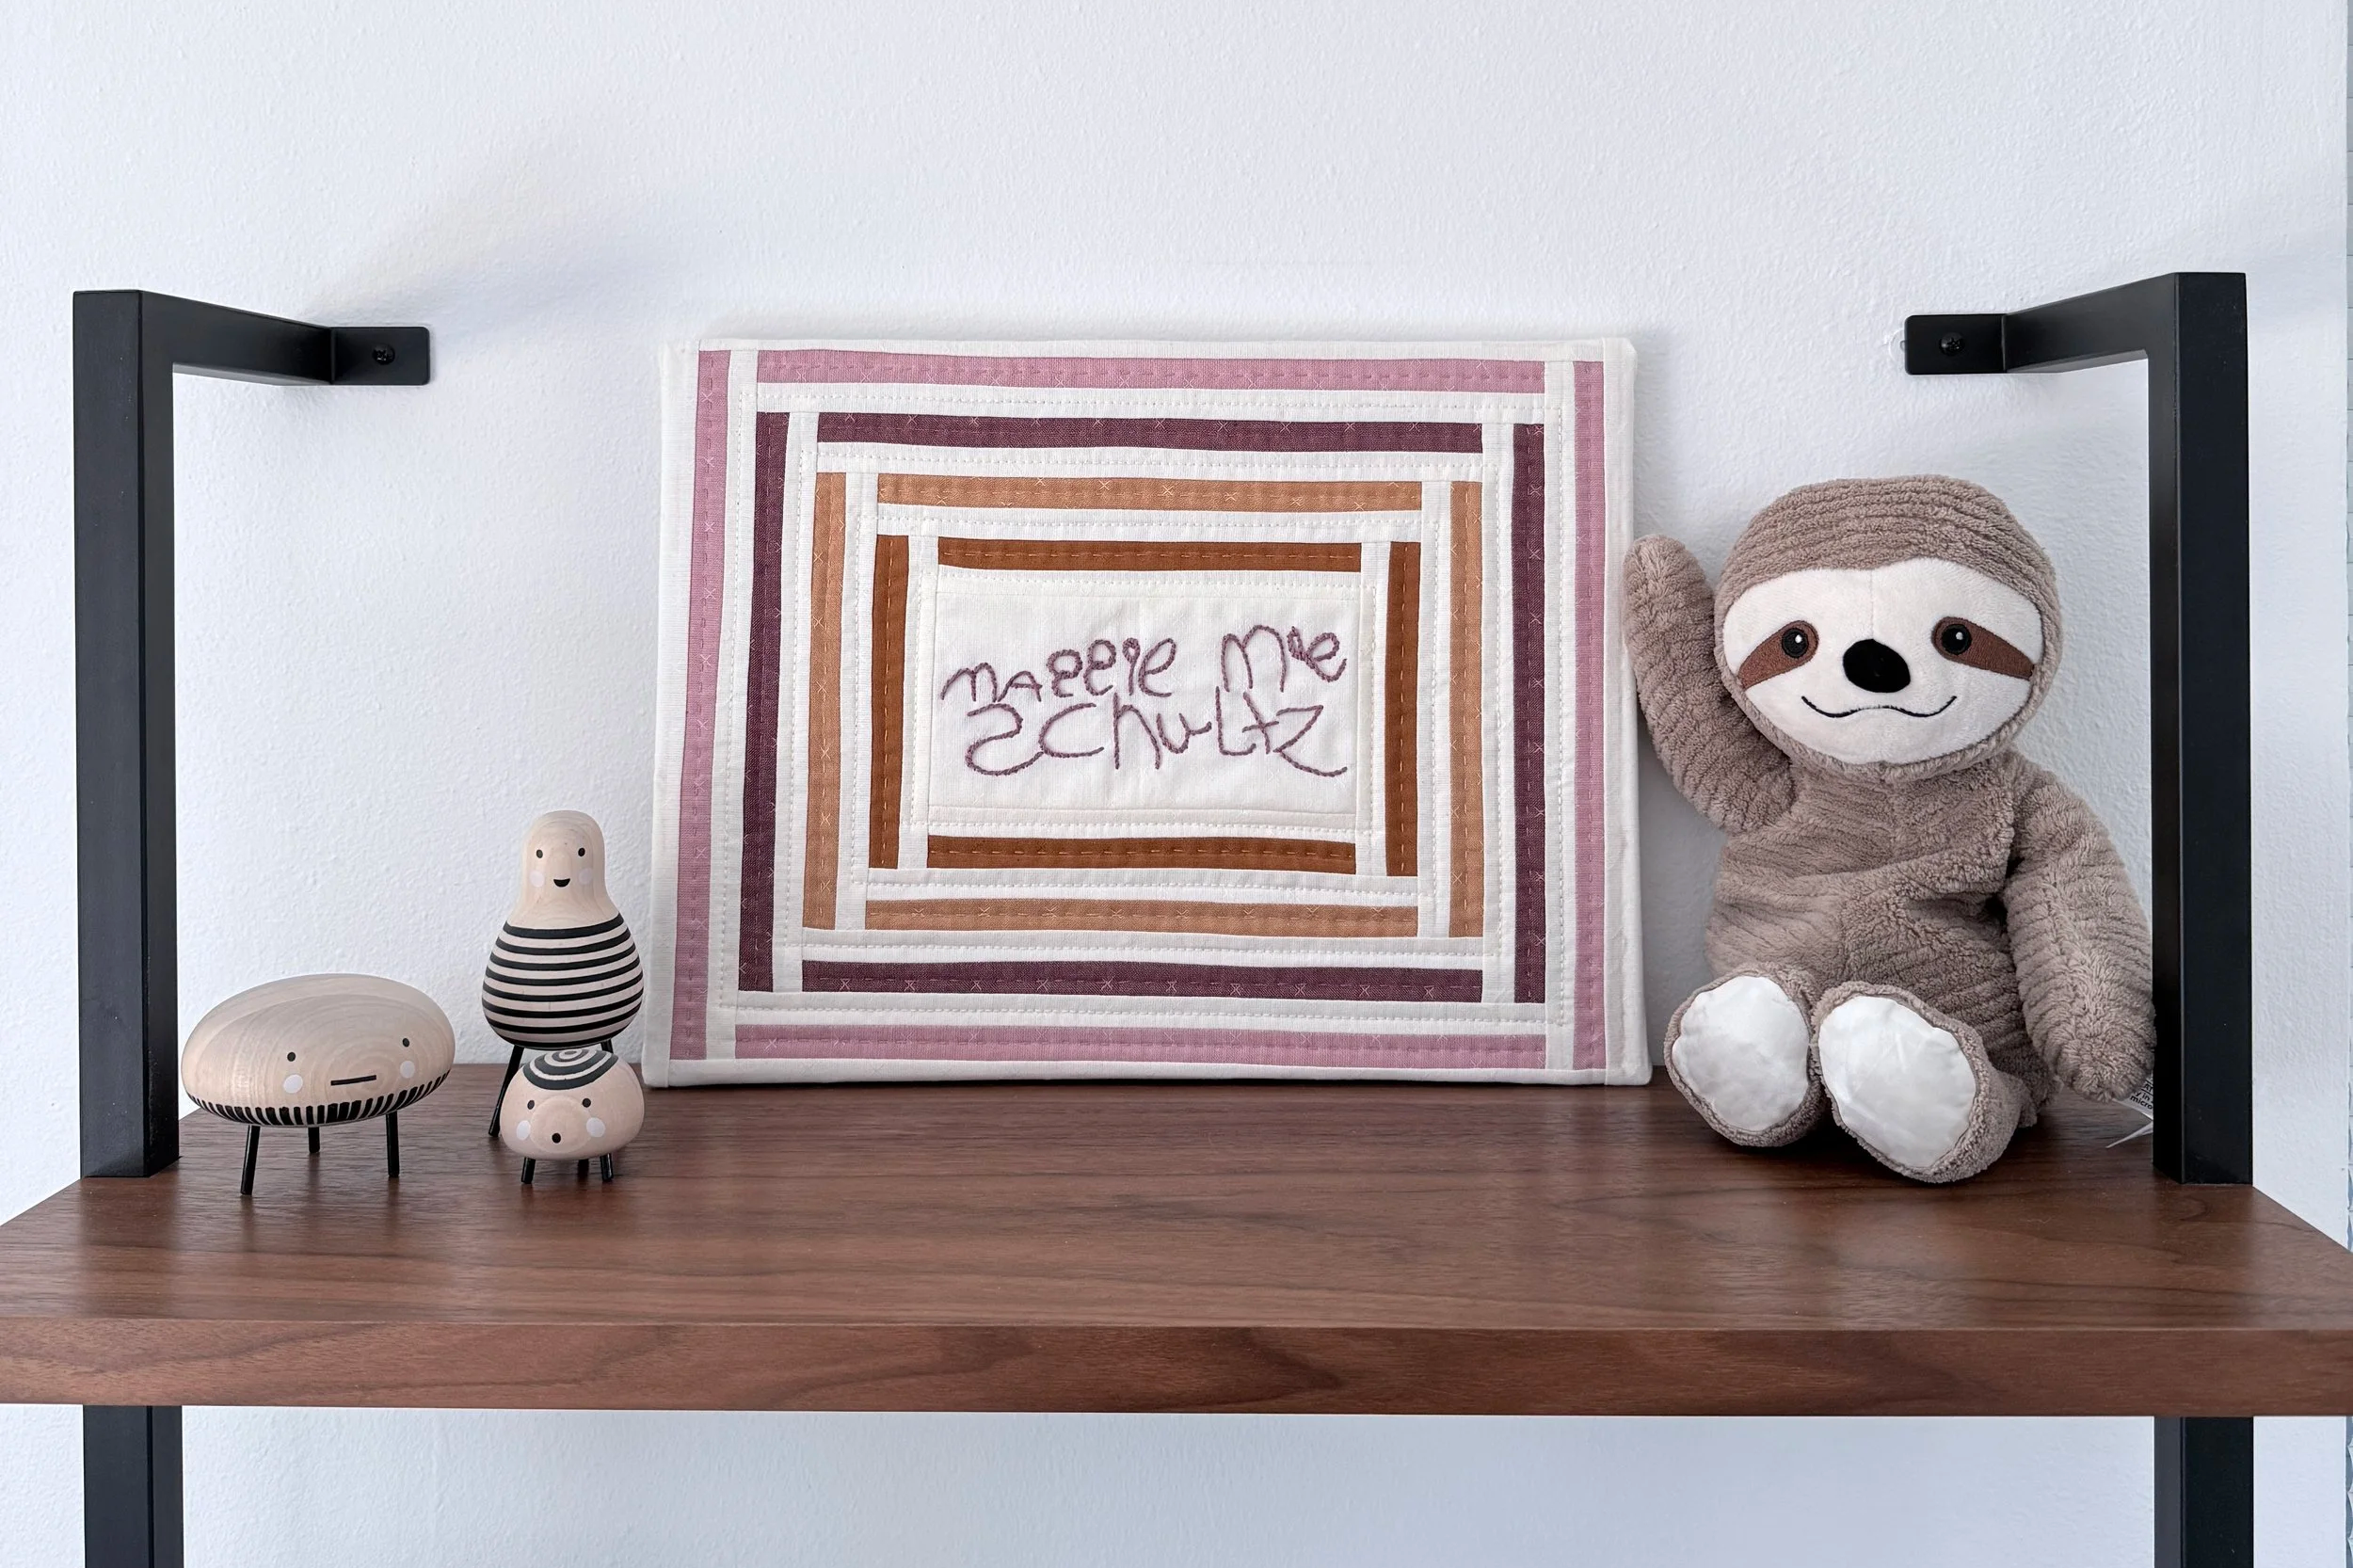
Finishing: Canvas Mounting
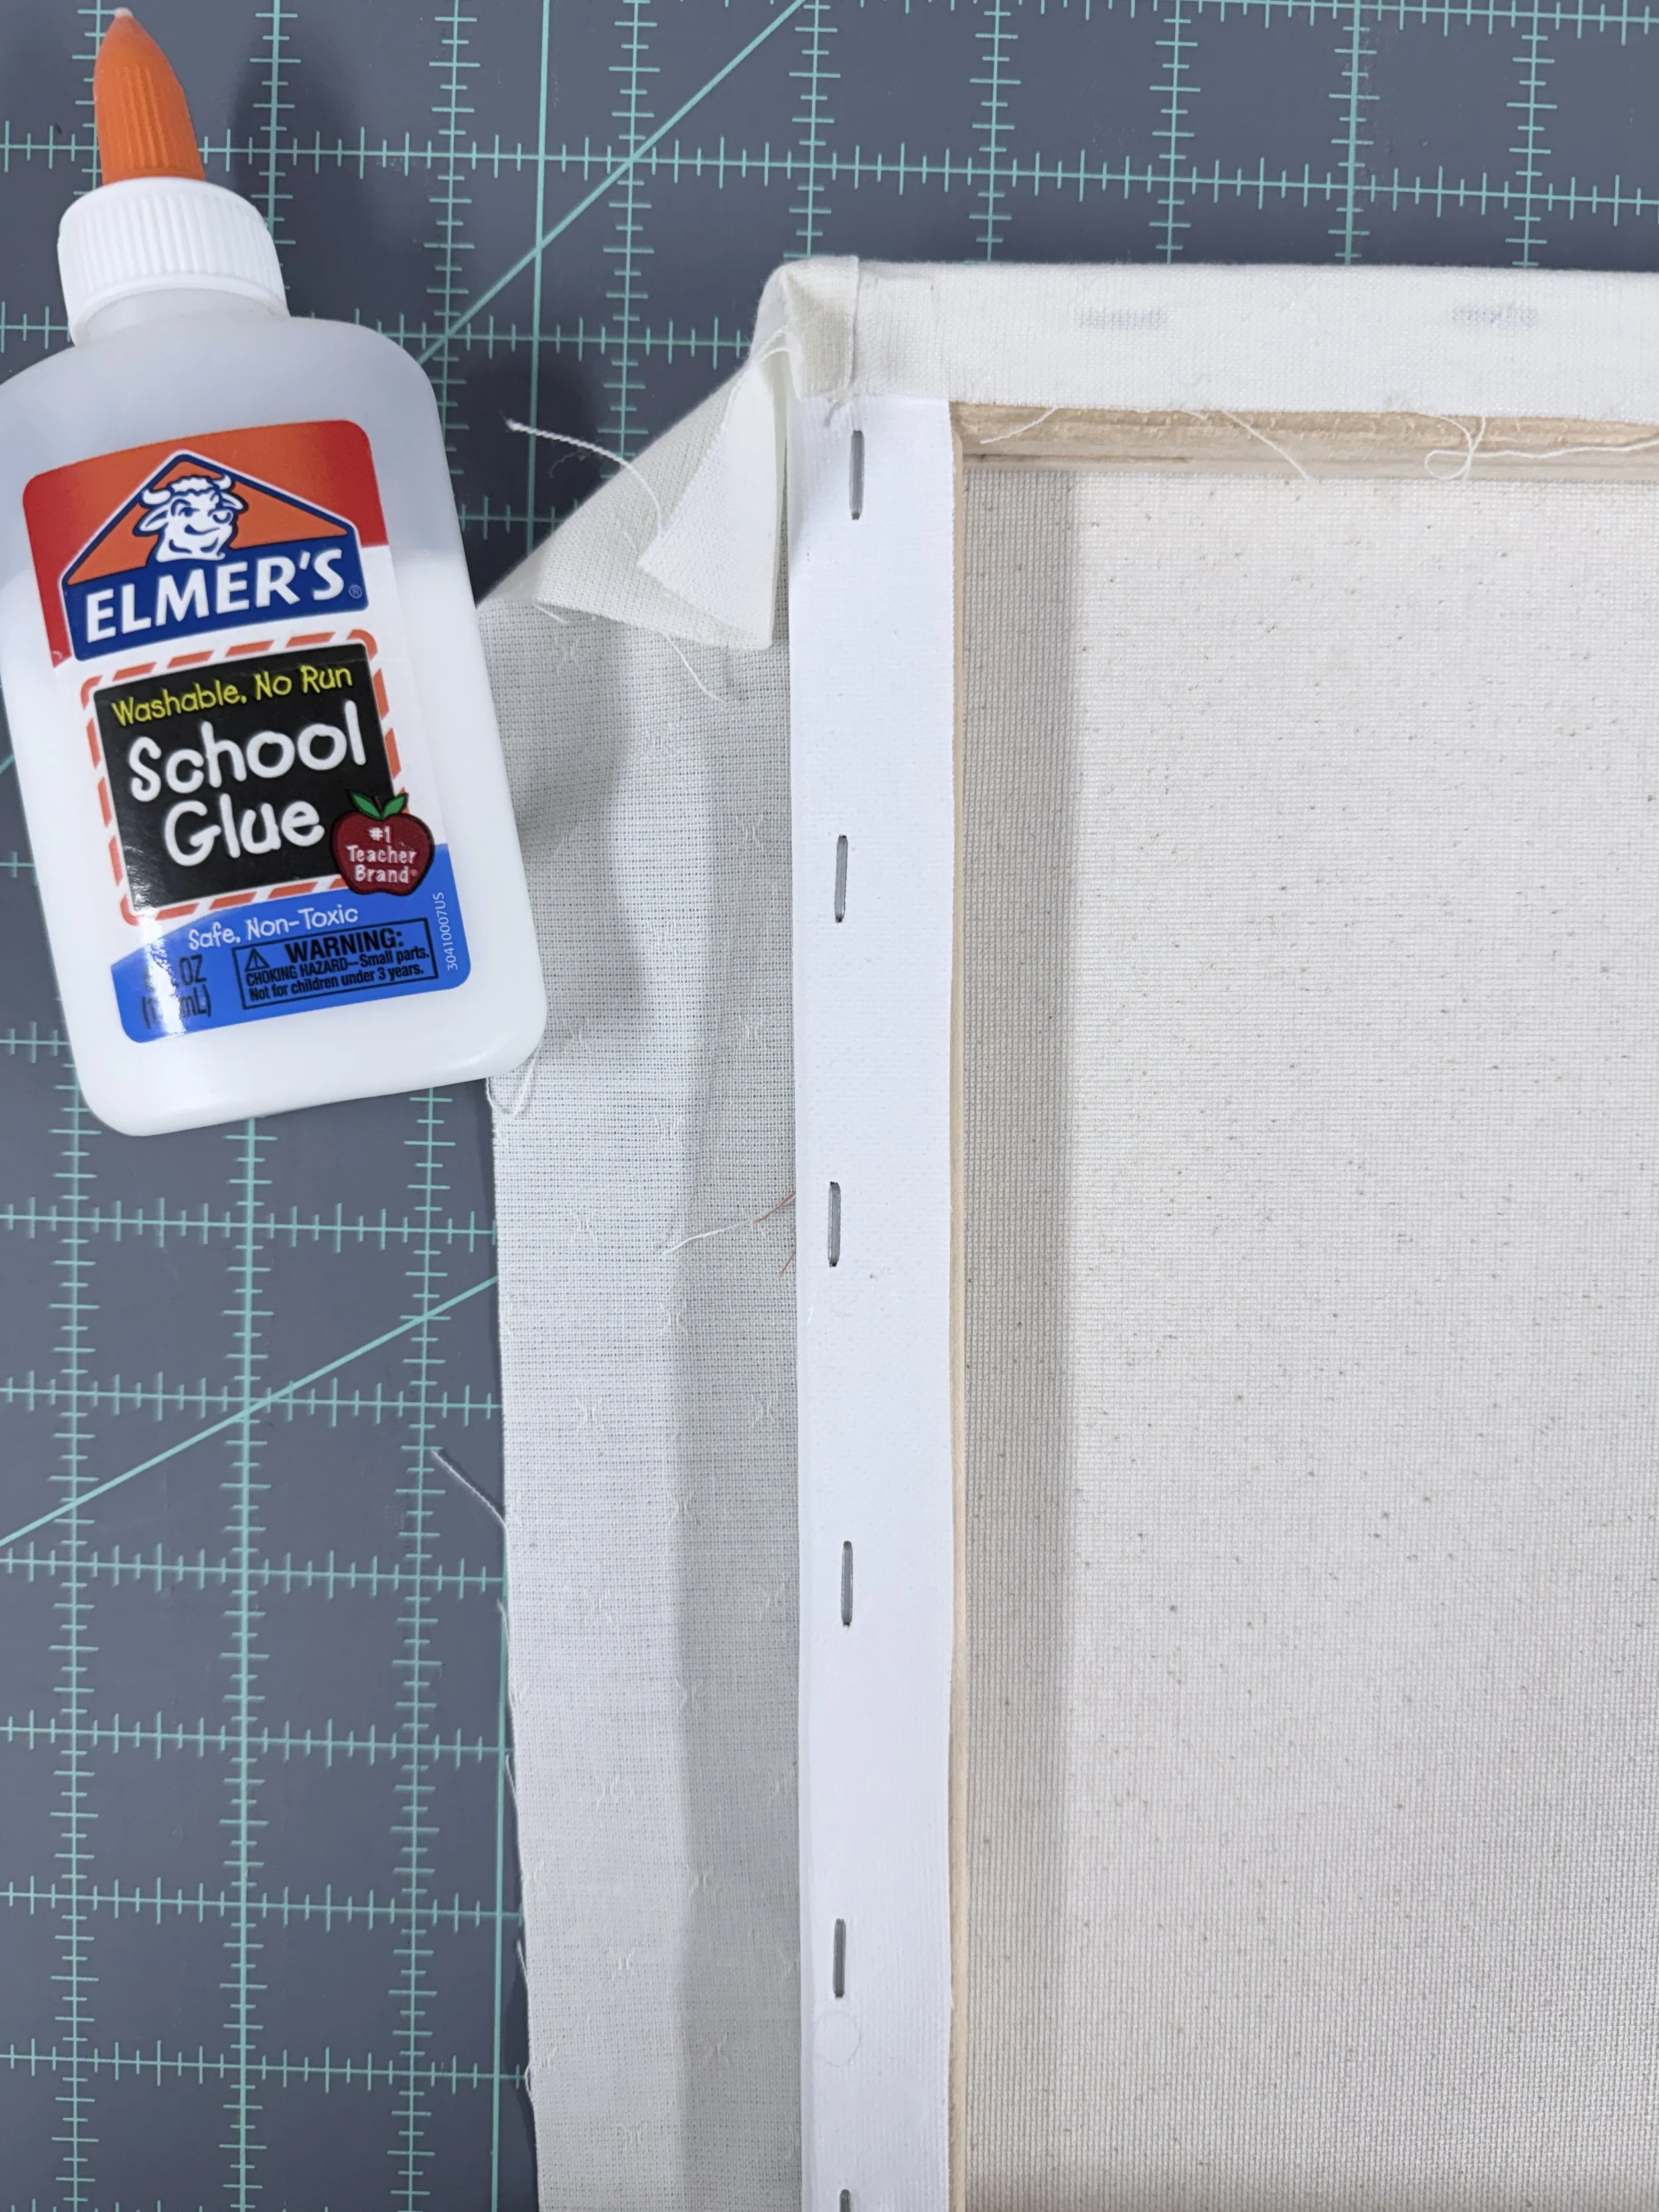
Mounting the finished piece on a canvas makes it so easy for my sister to hang it on the wall or just place it on a shelf. No framing needed, it's ready to display right away.
I used Elmer's washable glue to adhere the quilt to the canvas. Tip: make sure you spread the glue before placing the fabric down. This helps get rid of any visible glue lines that might show through once everything dries.

Supplies
Fableism Woven Sprouts in Cider, Sun Glow, Mulberry, Pansy Pink, and Sugar
Aurifil Cotton 12wt 2437 Light Peony, 8wt 2566 Wisteria, 12wt 6722 Sea Biscuit, 12wt 2318 Cashmere, 8wt 2930 Golden Toast, and 40wt 2600 Dove
Canvas 12” x 16” (or size best for your project)
Embroidery hoop
Frixion heat erasable pen
iPad (or lightbox) for tracing
Hera marker
Elmer's washable glue
Sewing machine with walking foot
Hand Quilting Supplies for the extra texture
Rotary cutter, mat, and ruler
And don’t forget to tag me @zahmco, I’d love to cheer you on.
Want to support my work and try Aurifil Floss? 🧵 Shop through my affiliate link here.
Learn More from Zahm Co.

QFA is the ultimate course for quilters at any stage who want to master essential quilting techniques and tools. Whether you’re just starting or looking to refine your skills, this course dives into the basics and beyond, covering valuable tips and methods that even seasoned quilters may not know. QFA is all about creating a solid foundation to elevate your quilting journey.

This step-by-step course is ideal for quilters who want to dive into the art of whole cloth quilting. Learn how to create stunning quilts using just fabric, thread, and creative designs. With video lessons, a detailed workbook, and lifetime access, you’ll master this elegant technique at your own pace.

The Quilting Compass is more than a membership—it’s your guide through every stage of your quilting journey. As a member, you’ll gain access to exclusive downloadable PDFs, ad-free blog posts, and monthly content tailored to help you grow as a quilter. Whether you’re a beginner or an experienced quilter, The Quilting Compass ensures you always have the tools and inspiration you need to succeed.

Hello!
I’m Katie the designer and maker behind Zahm Co. Thank you for being here, I hope you find this blog helpful. For blog notifications, subscribe below!
Click the image to learn more about me.
xx