Grid View Quilt SAL: Week 2
Week 2: Cut Fabric + Sew Block 1
Welcome to Week 2 of the Grid View Quilt Sew Along (SAL)! This week will be cutting and piecing Block 1. If you recently joined the SAL, welcome! I’m Katie, creator and quilter behind Zahm [z-ah-m] Co. I’m excited to guide you over the next few weeks as we make Grid View quilt top together.
If you haven’t yet, grab your pattern here PDF Grid View Pattern or Paper Grid View Pattern.
SAL Schedule
Week 1: Select Fabric & Gather Supplies
Sponsor: Quiltfolk - One-Year Subscription + Quiltfolk Life V1 Book ($85)
Week 2: Cut Fabric + Sew Block 1 - July 17th
Sponsor: Creative Grids - Stripology XL Ruler ($85)
Week 3: Sew Blocks 2 + 3 + 4 - July 24th
Sponsor: Elegant Virgule Inc - $50 gift card + Liberty Bundle of Tana Lawn fabrics ($100)
Week 4: Assemble Quilt Top - July 31st
Sponsor: Oliso - (1)ProPlus SmartIron + (1)Mini Iron ($260)
Sponsor: Ollie Fabrics - $50 Gift Card ($50)

Week 2 Assignment: Cut Fabric + Sew Block 1
This week, we are pressing fabric, cutting fabric strips, and sewing block one. Cutting Instructions (when using a Stripology ruler) will take around 35 minutes, so we will also use this week to sew Block 1. Grid View is a quick sew, and I have pieced one over a weekend, but we are spreading it out over four weeks. Note - if you want to sew ahead, please take “weekly” photos to post and be able to enter the weekly giveaways.
PS - I am making a small throw size using Fableism Monarch Grove Wovens.
Time Management
As a full-time employee, small business owner, and wife with a senior pup, I like to know how long something will take me to better manage by day or week. For each week I will post the time it took me to complete the week’s assignment; however, I do want to share that this is my SIXTH time piecing a grid view quilt top. Please keep that in mind as you best manage your week.
Katie’s total time to complete Week 2 Assignment: 2 hours and 45 minutes
Cut Fabric
Before you cut
Pattern corrections, depending on the version, there may have been a few updates; note this affects mostly the Twin size.
Change your rotary cutter blade if it’s been a while. A new blade can make a huge difference.
For accuracy, cut with the measurements from the ruler, not the cutting mat.
Press all fabric before cutting; I love my Best Press.
I rarely prewash fabrics; the only times I do is when I use hand-dye or fleece fabrics.
Favorite Tools for Cutting
Quilting Ruler Stripology XL (saves me half the time)
Tip 1: Pressing Fabric
Y’all know my favorite iron - Oliso. I really love how hot they get, the technology behind them, and the auto lift feature. I even use the Oliso mini daily; it pairs perfectly with my wool mats. But I want to discuss the difference between ironing and pressing the fabric. Ironing is a side-to-side movement once your iron is on the fabric. You might have read, as a quilter, to stay away from this motion, and when I am piecing I 100% agree. But when I am ironing yardage for the first time, I must admit it looks more like ironing than pressing. Pressing is an up-and-down movement with your iron. You press the iron down on your seam, lift up and then press it down on the next seam.
Tip 2: Square Up Yardage
One of the best cutting tips I can give you for quilt piecing is to start with a straight cut. To get the most out of this video, watch the being on how to prep and lay the fabric out, then jump to the 6:00 minute mark to watch how it square up fabric on the left side of the yardage. (note - I am right-handed)
Tip 3: Stripology Ruler
Want to save a ton of time cutting fabric? Let me tell you, and better yet, show you my favorite quilting tool of ALL time—the Creative Grids Stripology XL Ruler. Three benefits I have found with using the Stripology Ruler: precise and accurate cutting, time-saving, and reduced fatigue.
As a modern quilter, consistency on every cut and sewn piece is key for your quilt piecing to be accurate. Since it all starts with a cut, why not invest in the Stripology Ruler? Trust me; it is worth every penny.
We will dive into my three favorite ways to use the ruler:
Square Up Fabric, aka starting with an accurate straight line
Cut Width of Fabric (WOF) strips from yardage
Cut strips from sewn pieces
Tip 4: Directional Fabric B
If you are working with directional fabric, you only need to focus on Fabric B. If your directional fabric is A, C, or D, you can follow the pattern as it is, and it won’t be an issue. Now ‘issue’ is a strong word, as you can still follow the pattern with your directional Fabric B, but if you are like me and the little stuff matters, I will share the extra steps to take. I discussed that and the extra fabric needed for Fabric B in the week 1 blog post.
Fabric B Cutting Instruction changes (optional)
Baby: cut 8 - 1 ½” x WOF B3, then cut 4 - 1 ½” x 7 ½” in the opposite direction (with the selvage) and use these for Block 4 Row 2.
Small Throw: cut 11 - 2” x WOF B3, then cut 4 - 2” x 11” in the opposite direction (with the selvage) and use these for Block 4 Row 2.
Twin: cut 14 - 2 ½” x WOF B3, then cut 4 - 2 ½” x 14 ½” in the opposite direction (with the selvage) and use these for Block 4 Row 2.
Sew Block 1
Tip 5: Be Consistent
As you read, you’ll find I throw a lot your way; feel free to take it or leave it. I only ask one thing of you: be consistent. Whatever you want to take on (or not), just continue it the whole way through with each block and the quilt top assembly.
Tip 6: Strip Piecing, Chain Piecing, and Nesting Seams
This block has the most piecing, but these three tips will knock it out quickly. Strip piecing, chain piecing, and nesting seams will help you save time, thread, and brain power. Since they are all defined in the pattern, I will add a few additional resources here to keep it all in the same place.
Remember this video from week 1? Check the time below for a demonstration of the following techniques.
Strip Piecing - 10:21
Chain Piecing - 11:47
Nesting Seams - 15:06
Tip 7: Woven Fabric
If you use woven fabrics, like me, aren’t they so soft and delicious? My biggest tip when working with wovens is to touch them as little as possible. Every time you touch, move or press them, the edge will fray, and their shape will change.
Sew at a scant quarter inch (¼”), depending on the thickness of the woven material. Both times I’ve made Grid View with wovens, I’ve used a scant quarter inch, and it makes the biggest difference with my final block sizes. The first time was with Sprout Wovens by Fabelism, and now with Monarch Grove Wovens by Fableism. - move your needle 1 to 2 to the right due to the thicker fabric, and test it out.
Tip 8: Scant Quarter Inch (¼”) - recommending for woven fabrics only
A scant ¼” is sewing the seam allowance a hair narrower than ¼”. To do this, adjust the needle one to two spots to the right. I used my Bernina 770 QE for this project and adjusted my needle to the right by two spots. This will give you more room when you go to press your fabric open which, in the long run, will end up with the correct size block. For a visual, follow the images below; in the left column, I use a neutral needle, giving me a perfect ¼” seam; following the right column, I moved my needle resulting in a scant ¼” seam.
NOTE: before committing to a scant ¼”, please test this out, as all machines are different, and everyone sews differently.
PS - a fun community over competition story: I didn’t know the sewing needle could move on your machine until I was about 15 years into my sewing journey. I was taking a class at Wooden Spools, and one of my classmates mentioned it and then showed me how it worked on my machine at the time, Husqvarna Viking. I was speechless.
Neutral Needle (perfect ¼” seam)

Bernina 770 QE - needle in neutral position
Moved Needle (scant ¼” seam)
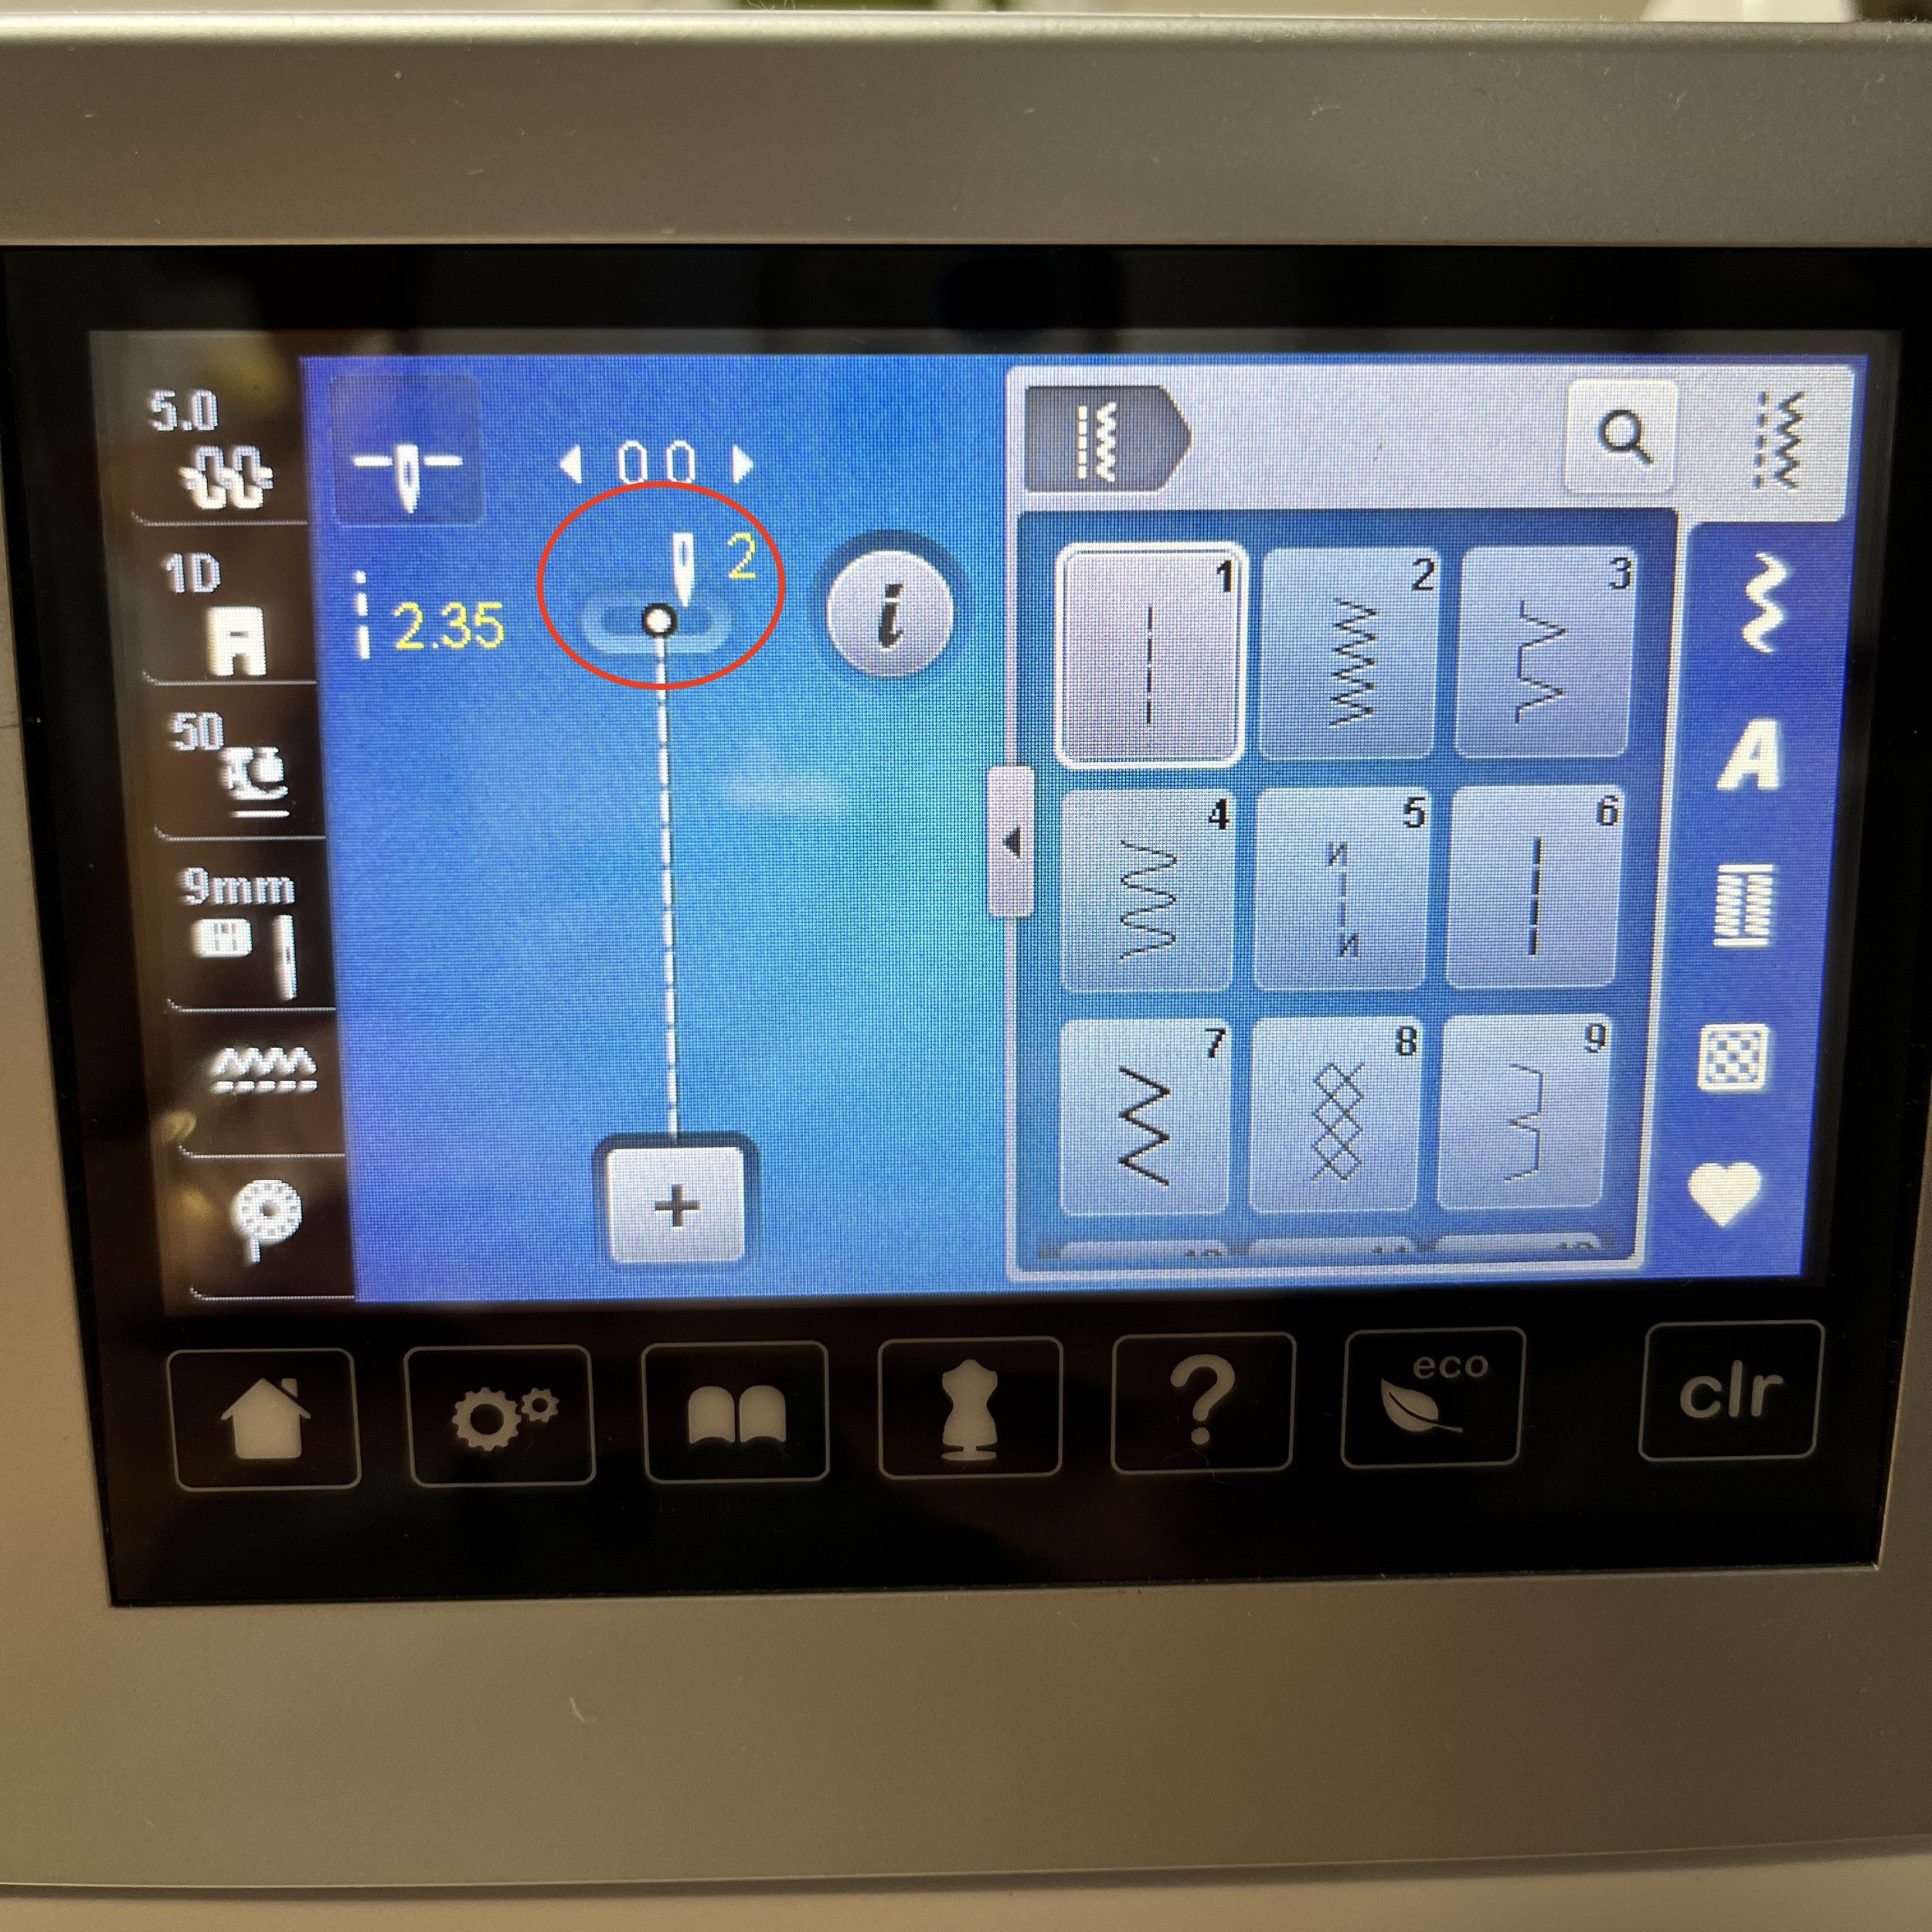
Bernina 770 QE - needle moved to the right by 2

The needle is in a neutral position, and the ¼” on the ruler matches perfectly with the seam.

The needle moved two to the right, and the ¼” on the ruler hair narrower than scant ¼” seam.

Open seam, the length is a a little short.

Open seam, the measurement is perfect
Tip 9: Table 1
When writing this pattern, I went back and forth on capturing the steps for each size best. A few things to note when reading each table to ensure we are all on the same page. You’ll take action for each instruction as you read the pattern steps. Then once done, you will follow the table by either repeating the step, trimming the strip, then repeating the step, or trimming the strips you have sewn, and sometimes you will do all of the above. Also, when it says “throw,” it references the small throw size.
Tip 10: Table 2
Note if making the small throw size, you will use every piece of the 21” strip, as you will trim this down to fit 6 rows. Everything else has a little wiggle room when you trim the rows.

Tip 11: Trimming
The quickest and most accurate way to trim your strips is using a marked Stripology XL Ruler. Please note not every trim is the same for each size quilt. For example, if you are making a small throw, you will trim rows for Block 1 at every 3.5”. But then when you move to Block 3, you will trim every 5” or 2” depending on the row.
Watch the video below for a demonstration.
When using the Stripology ruler, I mark where I want to trim to ensure accurate cuts and less quilt math. I use washi tape to mark my cuts.
Ensure the lines in the center strips match the lines on the ruler
Katie’s Week 2: Assignment
Cut Fabric
Sewn Block 1 (9 blocks)
Also, I have noticed this fabric is giving it a more scrappy look, and I’m not sure how I feel about it yet.

Enter Week 2 Prize
To enter the Week 2 prize, post a photo of your cut fabric and completed Block 1 on Instagram and use the hashtag #gridviewquiltsal. Post by Sunday, July 23, 2023, 11:59 pm MST, to be entered into the Week 2 prize.
Week 2 Prize - One lucky person will win my favorite quilting ruler, the Stripology XL Ruler. Good Luck!
Sponsored by Creative Grids
Winner: @krisbee1; congrats, Kris!

